
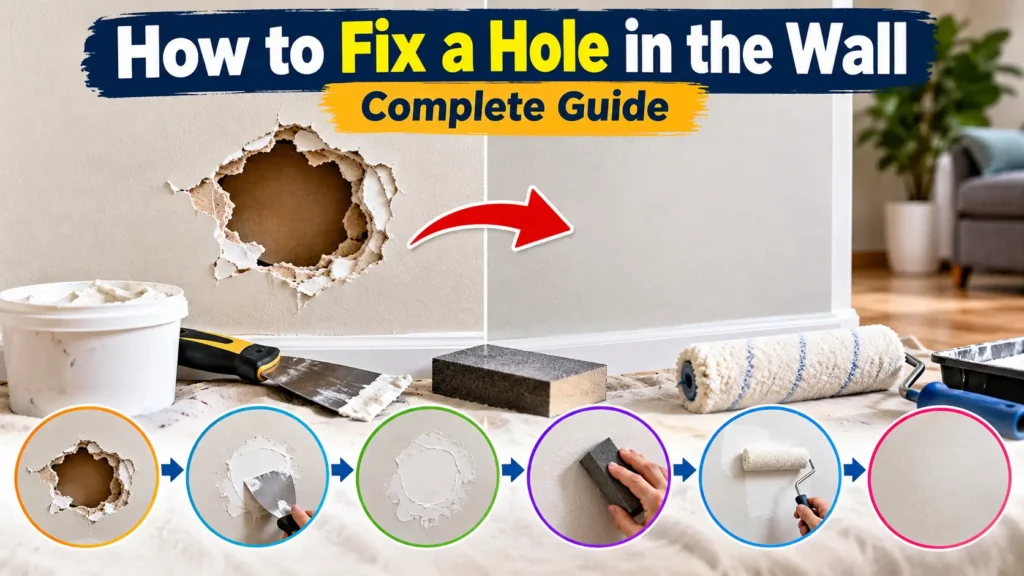
A hole in the wall can make an otherwise clean room look unfinished, but many small and medium wall holes are easier to repair than they may seem. Whether the damage came from a nail, picture hook, door handle, furniture, or an accidental impact, the right repair method depends on the size and type of hole.
In this guide, you’ll learn how to fix a hole in the wall step by step, including how to repair small nail holes, medium drywall damage, and larger holes that need a patch. You’ll also learn what tools you need, how to get a smooth finish, and when a wall repair is better left to a professional.
What Type of Hole Do You Have?
Before repairing the wall, look at the size and condition of the damage. Choosing the right repair method can save you time and prevent an uneven finish.
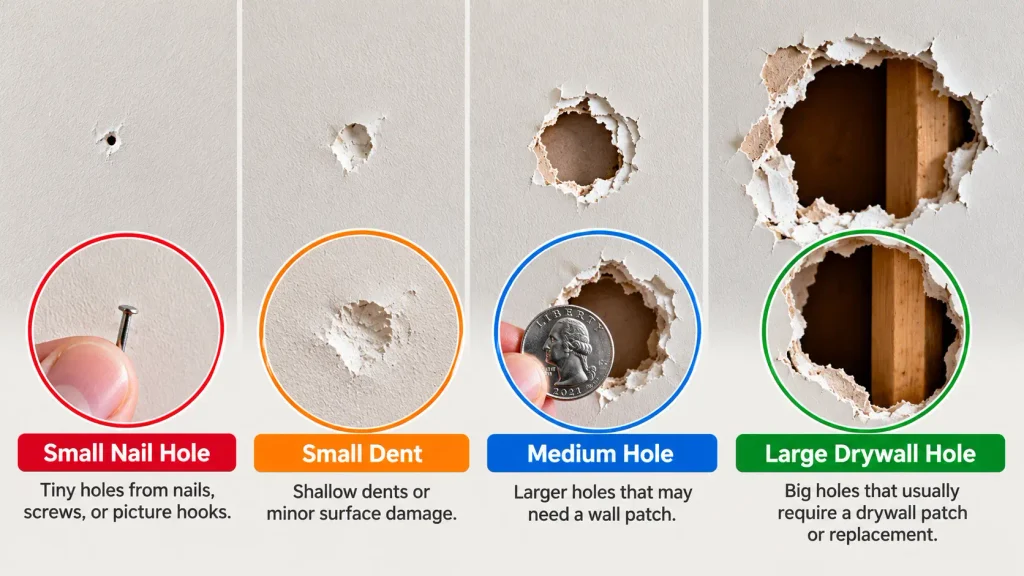
Small Nail or Screw Holes
Small holes from nails, screws, or picture hooks are usually the easiest to repair. A small amount of spackle or lightweight joint compound is often enough.
Small Dents and Surface Damage
A shallow dent or small chipped area may only need a little joint compound followed by sanding and painting.
Medium Holes
A larger hole may need a self-adhesive patch or another suitable wall-repair patch before applying joint compound.
Large Drywall Holes
Large holes may require cutting away damaged drywall, adding support behind the opening, installing a replacement piece, taping the seams, and applying several coats of joint compound.
Tip: If the wall contains electrical wiring, plumbing, or other hidden services, don’t cut into the wall until you know it is safe to do so.
Tools and Materials You May Need
The exact supplies depend on the size of the hole, but common wall-repair materials include:
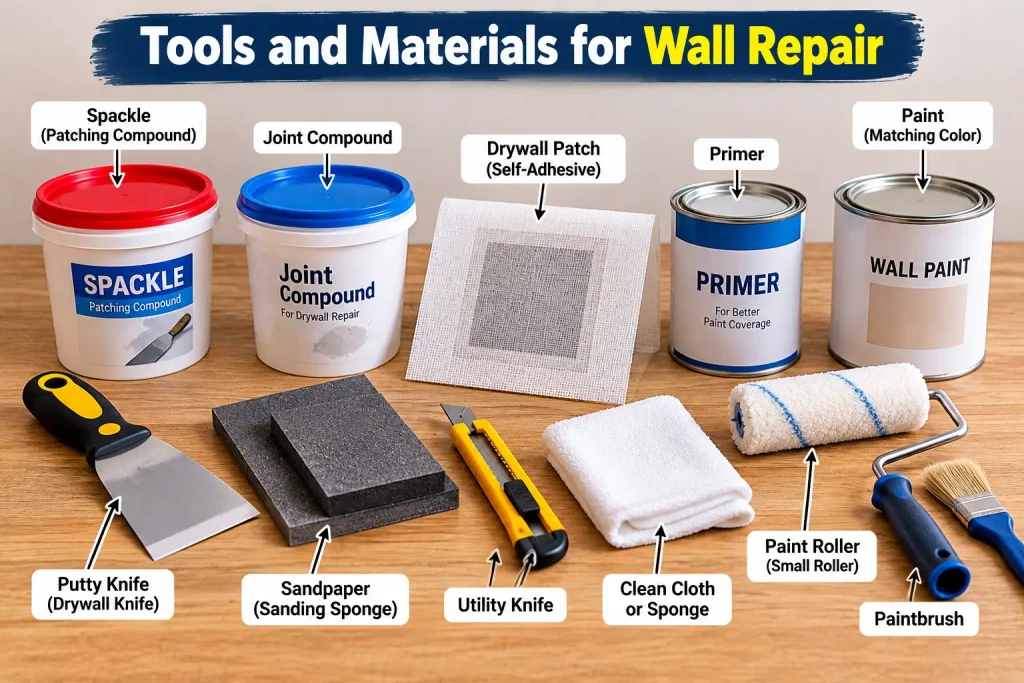
- Spackle or lightweight patching compound
- Joint compound
- Putty knife or drywall knife
- Sandpaper or sanding sponge
- Drywall patch for medium holes
- Utility knife
- Clean cloth or sponge
- Primer
- Matching wall paint
- Paintbrush or small roller
- Drop cloth or protective sheet
For larger drywall repairs, you may also need a replacement piece of drywall, drywall tape, screws, and suitable backing material.
How to Fix a Hole in the Wall: Small Holes
Small nail and screw holes can usually be repaired in a few simple steps.
For additional drywall-repair guidance, see USG’s drywall repair tips, which explains how to clean, fill, dry, sand, and prime small wall holes.
1. Clean the Hole
Remove loose paint, dust, or damaged material around the hole.
Use a clean, dry cloth to remove dust from the surface. If the edges are rough, carefully smooth away loose material so the patching compound has a stable surface to adhere to.
2. Apply Spackle or Patching Compound
Use a putty knife to press a small amount of spackle or suitable patching compound into the hole.
Spread a thin layer over the surrounding surface and slightly beyond the hole. Avoid applying a thick amount all at once because it may take longer to dry and can shrink or crack.
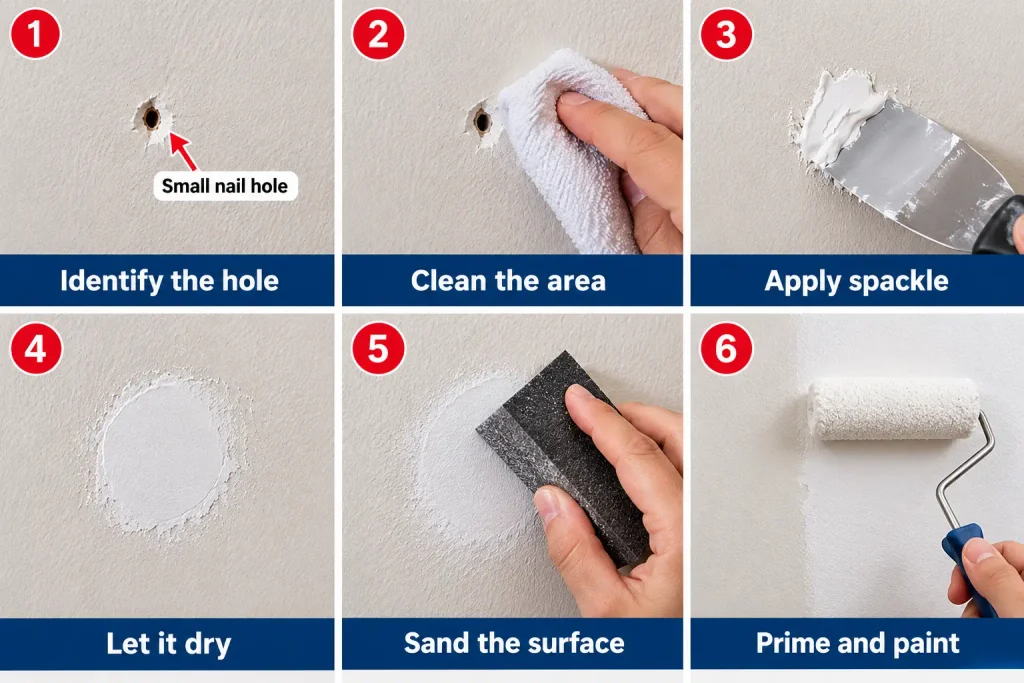
3. Let It Dry
Allow the compound to dry according to the manufacturer’s instructions.
Drying time can vary depending on the product, thickness of the application, temperature, and humidity.
4. Sand the Repaired Area
Once the compound is completely dry, gently sand the area with fine-grit sandpaper or a sanding sponge.
The goal is to make the repaired area level with the surrounding wall without removing too much material.
5. Apply Another Thin Coat if Needed
Run your hand lightly over the repaired area.
If you can still feel a dip or see an uneven edge, apply another thin layer of compound. Let it dry and sand again.
6. Prime and Paint
Once the repair is smooth and dust-free, apply primer to the patched area if appropriate for your paint and repair material.
After the primer dries, apply matching wall paint.
For the best appearance, feather the paint slightly beyond the repaired area rather than creating a sharp paint boundary.
How to Fix a Hole in the Wall: Medium Holes
A medium-sized hole may need more support than simple spackle can provide.
For more detailed guidance on repairing medium drywall holes, see USG’s patch and repair instructions, which covers using joint tape, compound, drying, sanding, and priming.
1. Clean and Prepare the Damaged Area
Remove loose drywall, paint, and broken edges around the hole.
If necessary, carefully trim the damaged area into a more manageable shape. Avoid cutting deeper than necessary.
2. Choose a Suitable Wall Patch
For an appropriate medium drywall hole, use a suitable drywall repair patch according to the product instructions.
Make sure the patch is large enough to cover the damaged area and that the surrounding wall surface is reasonably clean and stable.
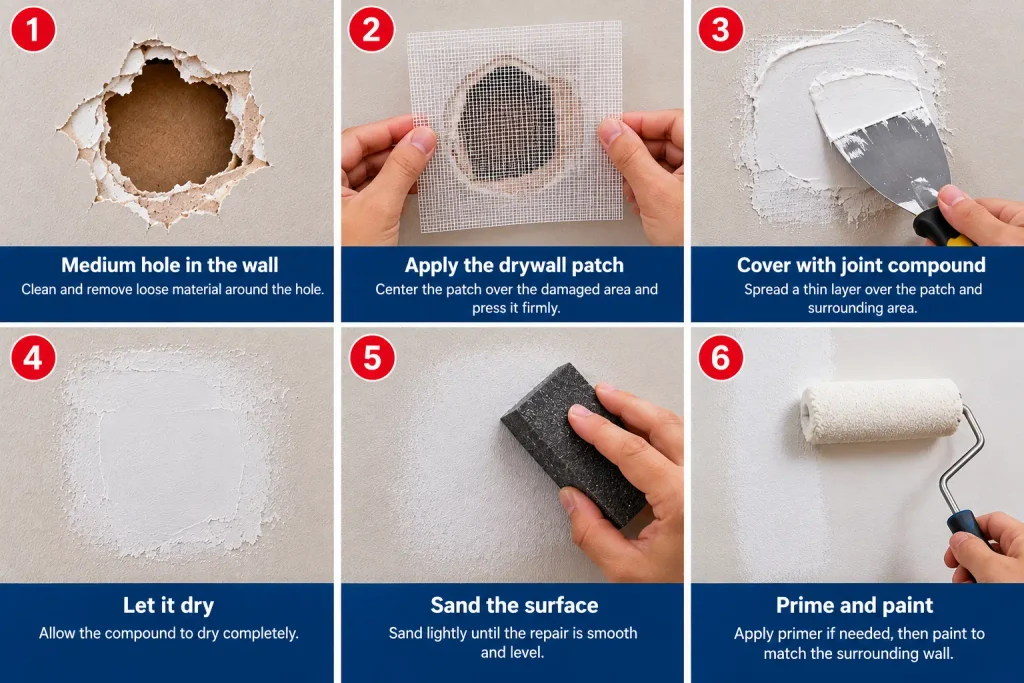
3. Apply the Patch
Install the patch according to its instructions.
Some patches are self-adhesive, while others require additional support or joint compound.
Press the patch firmly into place without damaging the surrounding drywall.
4. Cover the Patch With Joint Compound
Spread a thin layer of joint compound over the patch using a drywall knife or putty knife.
Extend the compound beyond the edges of the patch to help blend the repair into the surrounding wall.
Avoid trying to create the final finish with one very thick coat.
5. Let It Dry and Sand
Allow the compound to dry completely.
Then lightly sand the surface until it feels smooth and level.
Wipe away sanding dust before applying another coat.
6. Apply Additional Coats if Necessary
A medium repair may need more than one thin coat of joint compound.
Apply another coat, allow it to dry, and sand again until the patch blends smoothly into the surrounding wall.
7. Prime and Paint
Once the repair is smooth, clean, and completely dry, apply primer where appropriate.
Then paint the repaired area with a matching color and finish.
How to Fix a Large Hole in Drywall
Large holes require more preparation and may need a replacement section of drywall.
1. Inspect the Area Carefully
Before cutting the wall, check for possible electrical wires, plumbing, pipes, or other hidden services.
Safety note: If you cannot confidently determine what is behind the wall, do not cut into it. Electrical wiring or plumbing can be hidden inside walls, and a professional inspection may be safer.
If you are unsure what is behind the wall, stop and consider getting professional help.
2. Remove Damaged Drywall
Cut away the damaged drywall carefully to create a clean repair area.
Try to create a clean, manageable opening with straight edges so the replacement drywall is easier to measure and install.
Do not remove more wall material than necessary.
The opening should be manageable and suitable for the replacement piece.
3. Add Support Behind the Opening
A larger drywall patch generally needs support behind it.
Install suitable backing material according to the repair method you are using. Make sure the backing is secure before attaching the replacement drywall.
4. Cut a Replacement Piece
Measure the opening carefully and cut a replacement piece of drywall to fit.
The replacement should sit securely without forcing it into the opening.
5. Secure the Drywall Patch
Position the replacement piece and secure it to the backing using appropriate drywall screws or fasteners.
The patch should sit as close to flush with the surrounding wall as possible.
6. Apply Drywall Tape and Joint Compound
Cover the seams using suitable drywall tape and joint compound.
Spread the compound beyond the taped seams to gradually blend the repair into the surrounding wall.
Allow each coat to dry according to the product instructions.
7. Sand Between Coats
Once dry, lightly sand the surface.
Avoid aggressive sanding because it can damage the drywall paper or create a low spot.
Remove dust before applying another coat.
8. Prime and Paint
When the repaired area is smooth and fully dry, apply primer as needed.
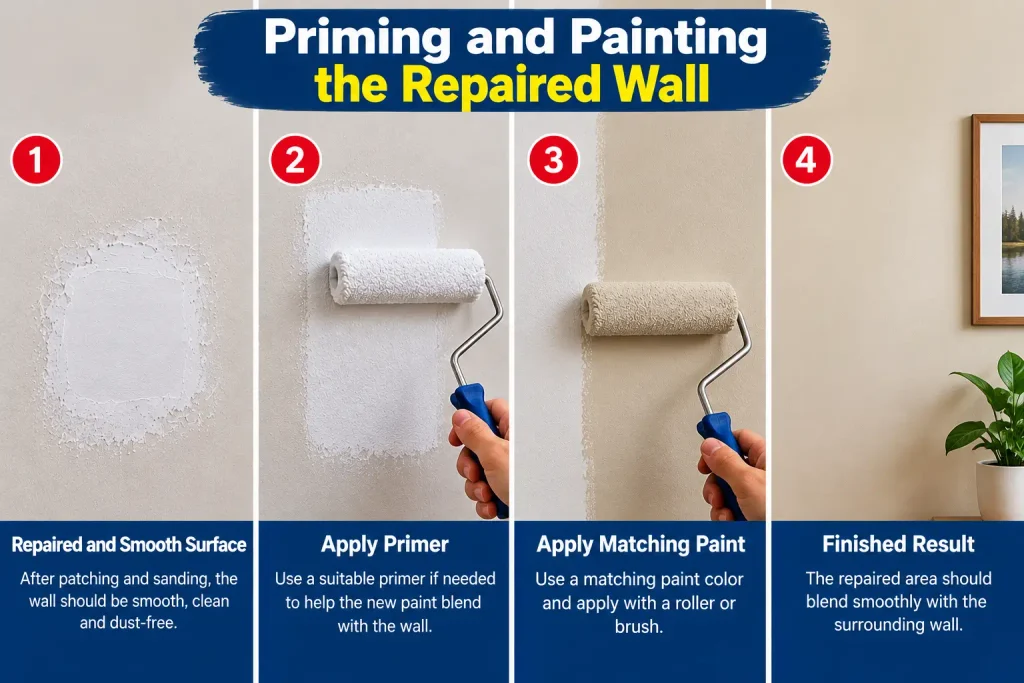
Then paint the repaired section to match the surrounding wall.
Depending on the age of the existing paint and the lighting in the room, you may need to paint a larger section of the wall for the repair to blend in properly.
How to Get a Smooth Wall Repair
The final appearance of a wall repair often depends more on preparation and sanding than on the amount of compound you use.
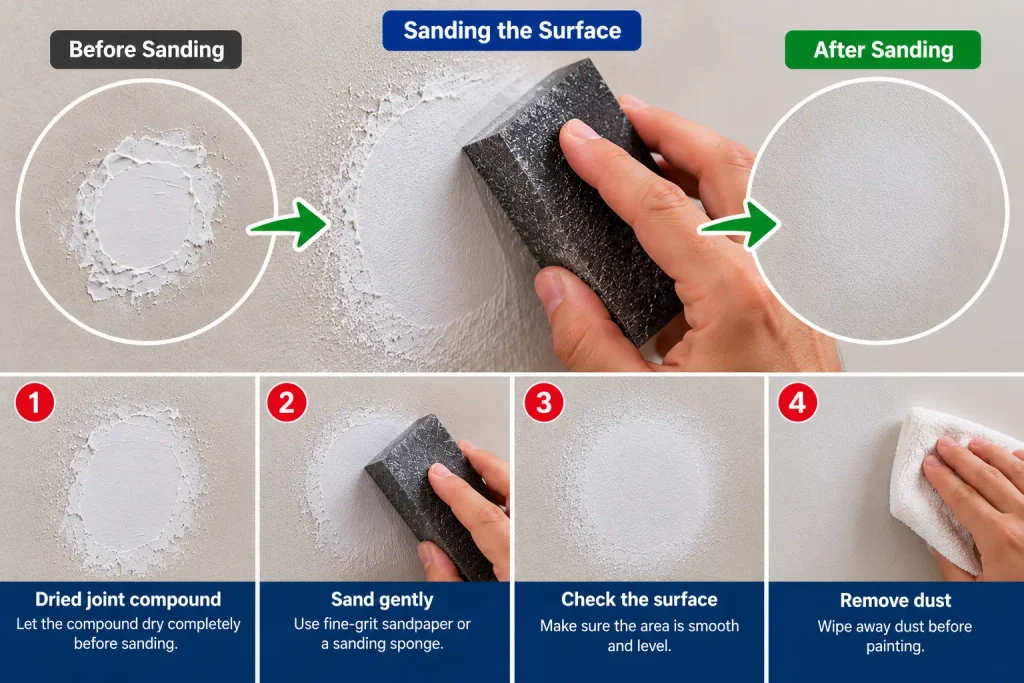
Keep these tips in mind:
- Apply several thin coats instead of one thick coat.
- Let each coat dry completely.
- Sand gently between coats when appropriate.
- Remove sanding dust before painting.
- Use primer when recommended for the repair and paint.
- Don’t rush the drying process.
- Check the repair from different angles before painting.
A repair can look smooth from one direction but still show a visible edge when light hits it from another angle.
Common Mistakes to Avoid
Avoid these common wall-repair mistakes:
Using Too Much Compound
A thick layer can take longer to dry and may shrink or crack.
Skipping Surface Preparation
Dust, loose paint, and damaged drywall can prevent the repair material from bonding properly.
Sanding Too Aggressively
Heavy sanding can damage the surrounding drywall and create a depression.
Painting Before the Repair Is Dry
Paint applied over damp compound can produce an uneven finish and may reveal the repair later.
Skipping Primer
A patched area can absorb paint differently from the surrounding wall. Primer can help create a more consistent surface before painting.
Ignoring Hidden Utilities
Never cut deeply into a wall if you don’t know what is behind it.
When Should You Call a Professional?
Many small wall holes are suitable for DIY repair, but some situations require professional help.
Consider contacting a qualified professional if:
- The hole is very large or extends through multiple wall layers.
- The wall has significant structural damage.
- You suspect electrical wiring or plumbing behind the damaged area.
- The drywall has extensive water damage.
- There is recurring moisture or mold around the damaged area.
- The wall damage is accompanied by cracks that appear structural.
- You are not comfortable cutting or repairing drywall.
If the hole was caused by a water leak, fix the source of the moisture before repairing the wall. Otherwise, the damage may return.
How to Prevent Holes and Wall Damage
You can reduce future wall damage with a few simple habits:
Other small home problems can also be easier to catch early with regular inspections. For example, see our guide How to Fix a Window That Won’t Close Properly: 7 Simple Solutions if you notice a window that is difficult to close.
- Use appropriate wall anchors for heavier items.
- Avoid overloading shelves.
- Add protective pads where furniture may hit the wall.
- Use door stops to prevent handles from damaging walls.
- Be careful when moving large furniture.
- Repair small dents and holes before they become larger.
- Check for moisture problems before repairing damaged drywall.
If your door is also making noise, see our guide How to Fix a Squeaky Door for practical repair tips.
Regularly checking small problems can also be part of your Monthly Home Maintenance Checklist
Frequently Asked Questions
Can I fix a small wall hole without replacing drywall?
Yes. Small nail and screw holes can often be repaired with spackle or a suitable patching compound. Larger holes usually require a patch or replacement section of drywall.
What is the easiest way to fix a small hole in the wall?
For a small nail hole, clean the area, fill it with suitable spackle or patching compound, let it dry, sand it smooth, and paint the repaired area.
Can I use toothpaste to fill a wall hole?
Toothpaste is sometimes suggested as a temporary solution for very tiny holes, but it is not a proper wall-repair material. For a durable repair, use a suitable spackle or patching compound.
How long does wall patching take to dry?
Drying time depends on the product, thickness, temperature, and humidity. Always follow the manufacturer’s drying instructions before sanding or painting.
Do I need to prime a patched wall before painting?
Primer is often useful because patched areas can absorb paint differently from the surrounding wall. Follow the recommendations for your patching material and paint.
Why can I still see the repaired hole after painting?
A repaired area may remain visible if the surface was not properly leveled, the compound was not fully dry, sanding was uneven, or the new paint does not match the existing wall.
Can I repair a hole in a painted wall without repainting the entire wall?
For a small repair, you can usually paint only the patched area if you have a close color and finish match. However, older paint may have faded or changed over time, so painting a larger section may blend the repair better.
Final Takeaway
Learning how to fix a hole in the wall starts with identifying the size and type of damage. Small nail holes may only need spackle and paint, while medium and large drywall holes require patches, joint compound, sanding, and careful finishing.
Take your time with surface preparation, apply thin coats, allow each layer to dry, and don’t skip the final sanding and priming steps when they are appropriate. With the right materials and a little patience, many common wall holes can be repaired to create a smooth, clean-looking finish.