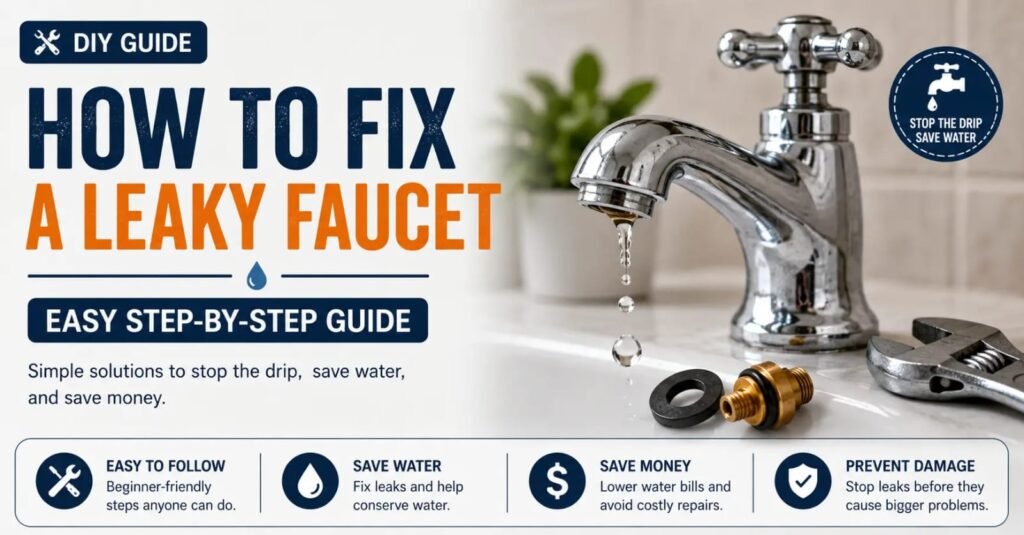
A leaky faucet is often easier to fix than you might think. A constant drip may seem like a minor annoyance, but it can waste water and may indicate a worn washer, O-ring, cartridge, or another internal component. The good news is that many common faucet leaks can be fixed at home with a few basic tools.
In this guide, we’ll show you how to identify where the leak is coming from, determine which faucet component may be causing the problem, and fix a leaking faucet safely.
How to Fix a Leaky Faucet: Why Is My Faucet Leaking?
A faucet can start leaking for several reasons. Some of the most common causes include:
- A worn-out washer
- A damaged O-ring
- A loose faucet component
- A worn cartridge
- Mineral buildup around internal parts
Before replacing the entire faucet, it is worth checking these common problems first.
Tools You May Need
Knowing how to fix a leaky faucet can help you save water and avoid unnecessary plumbing expenses.
Keep a few basic tools ready before starting:
- Adjustable wrench
- Screwdriver
- Replacement washer or O-ring
- Cleaning cloth
- Small container or bowl
- Plumber’s grease, if required
The exact replacement part depends on the type and model of your faucet.
If you know how to fix a leaky faucet correctly, you can prevent water waste and keep the problem from getting worse.
Where Is the Faucet Leaking From?
A faucet leak can come from different locations, and the location can help you identify the likely cause.
- Dripping from the spout: worn washer, cartridge, or valve component
- Water around the handle: damaged O-ring, cartridge, or loose component
- Leak underneath the sink: loose connection, supply line, or plumbing connection
- Water around the faucet base: worn seal or O-ring
If your kitchen faucet is specifically dripping from the spout, see our guide Kitchen Faucet Is Dripping From the Spout? 7 Easy Fixes.
Quick tip: Before taking the faucet apart, dry the faucet completely and watch where the first drop of water appears. This can help you narrow down the source of the leak.
Quick Diagnosis Before You Start
Before taking the faucet apart, dry the entire faucet with a towel and watch where the first drop of water appears. A drip from the spout can point to an internal valve component, while water around the handle or faucet base may indicate a seal, O-ring, cartridge, or connection problem. Identifying the leak location first can save you from replacing the wrong part.
Identify Your Faucet Type Before Taking It Apart
Common faucet types include:
Compression Faucet
Usually has separate hot and cold handles and uses a washer to control water flow.
Cartridge Faucet
Often has one or two handles and uses a cartridge inside the faucet body.
Ball Faucet
Usually has a single handle and a ball-shaped internal mechanism.
Ceramic-Disk Faucet
Uses ceramic discs to control water flow and is generally designed differently from traditional washer faucets.
Important: The repair procedure and replacement parts depend on the faucet design, so identify the faucet type before buying replacement parts.
Step 1: Turn Off the Water Supply
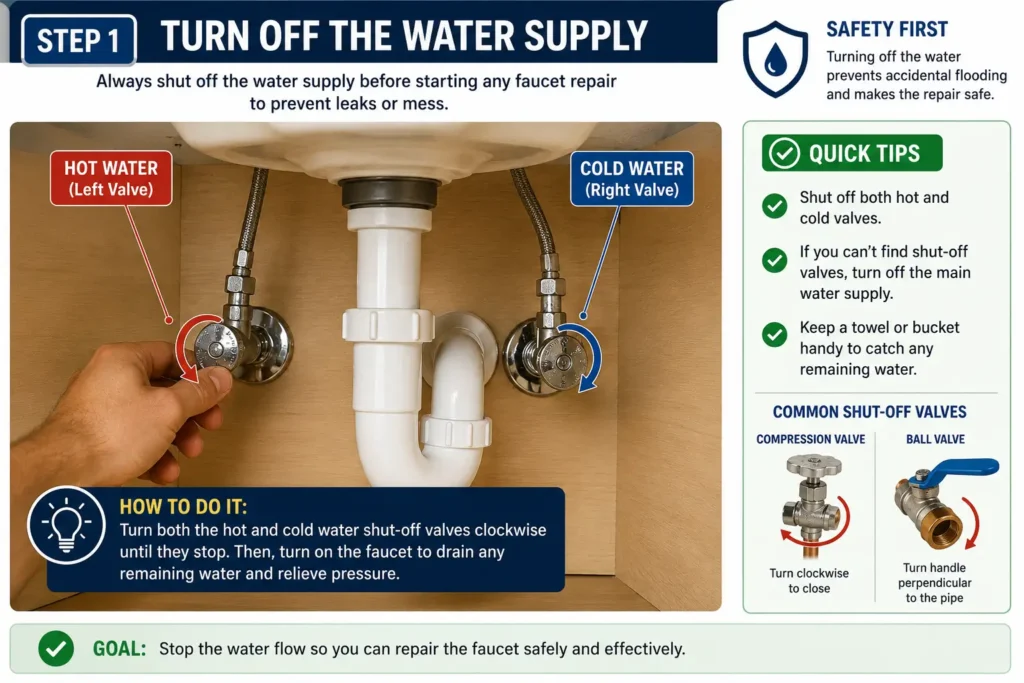
“Before you learn how to fix a leaky faucet, turn off the water supply to avoid spills.”
For more tips on finding and fixing household leaks, visit the EPA WaterSense Fix a Leak guide.
Look underneath the sink for the hot and cold water shut-off valves and turn them clockwise. Then open the faucet to release any remaining water.
This helps prevent water from spilling while you work.
Step 2: Cover the Drain
Place a drain stopper or cloth over the sink drain.
When learning how to fix a leaky faucet, covering the drain is important because small screws and parts can easily fall into it.
Step 3: Remove the Faucet Handle
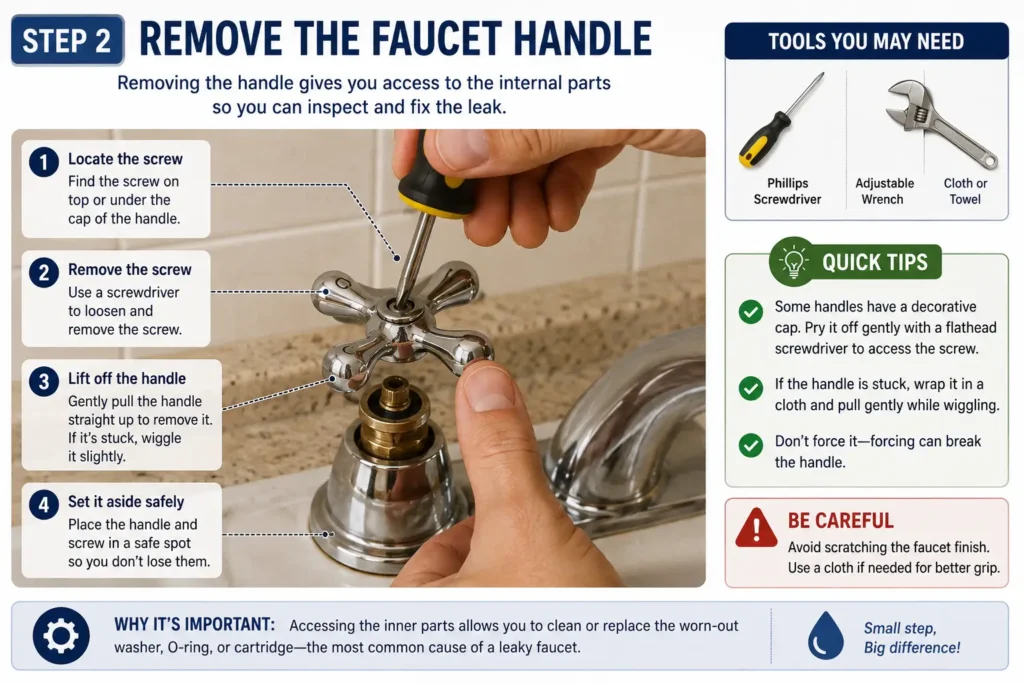
Carefully remove the decorative cap from the faucet handle, if present.
Use the appropriate screwdriver to remove the handle screw. Then gently lift the handle away from the faucet.
Avoid using excessive force, as older components may be fragile.
Step 4: Inspect the Washer, O-Ring or Cartridge
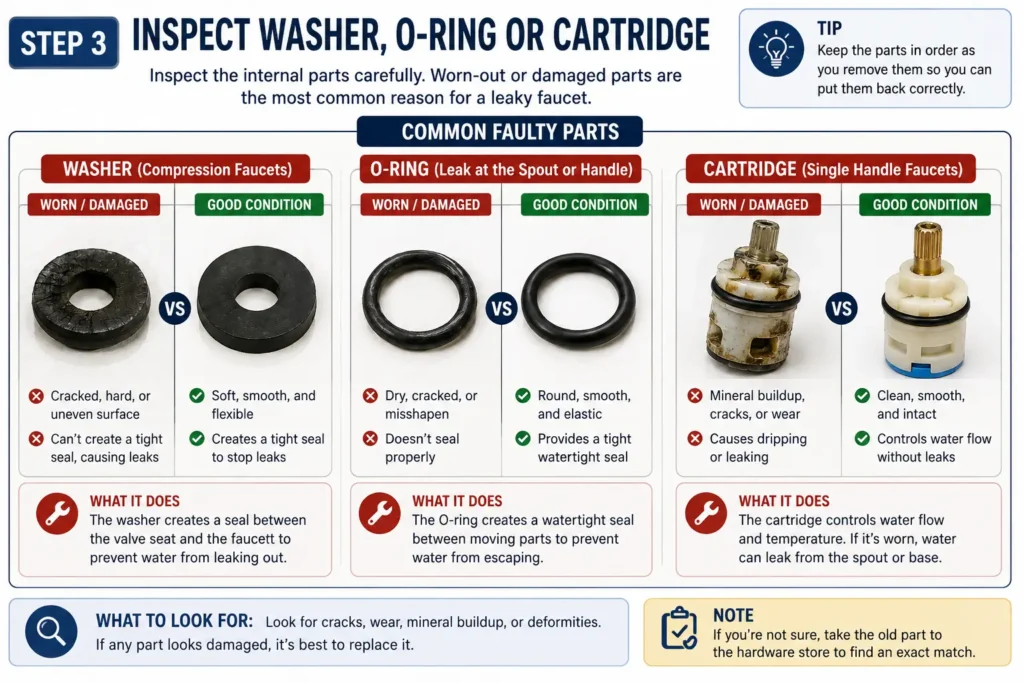
Once the handle is removed, inspect the internal components.
Look for:
- Cracked or flattened washers
- Damaged O-rings
- Worn cartridges
- Corrosion
- Mineral deposits
| What you find | Possible action |
|---|---|
| Flattened washer | Replace the washer |
| Cracked O-ring | Replace the O-ring |
| Damaged cartridge | Replace the cartridge |
| Heavy mineral buildup | Clean accessible components |
| Corrosion or visible damage | Consider replacing the component or faucet |
If a component looks damaged, replace it with a matching part designed for your faucet.
If you know your faucet’s brand and model number, check the manufacturer’s parts guide before buying a replacement. For Delta faucets, you can use the Delta Faucet parts and product identification guide to find compatible repair parts.
Step 5: Clean the Components
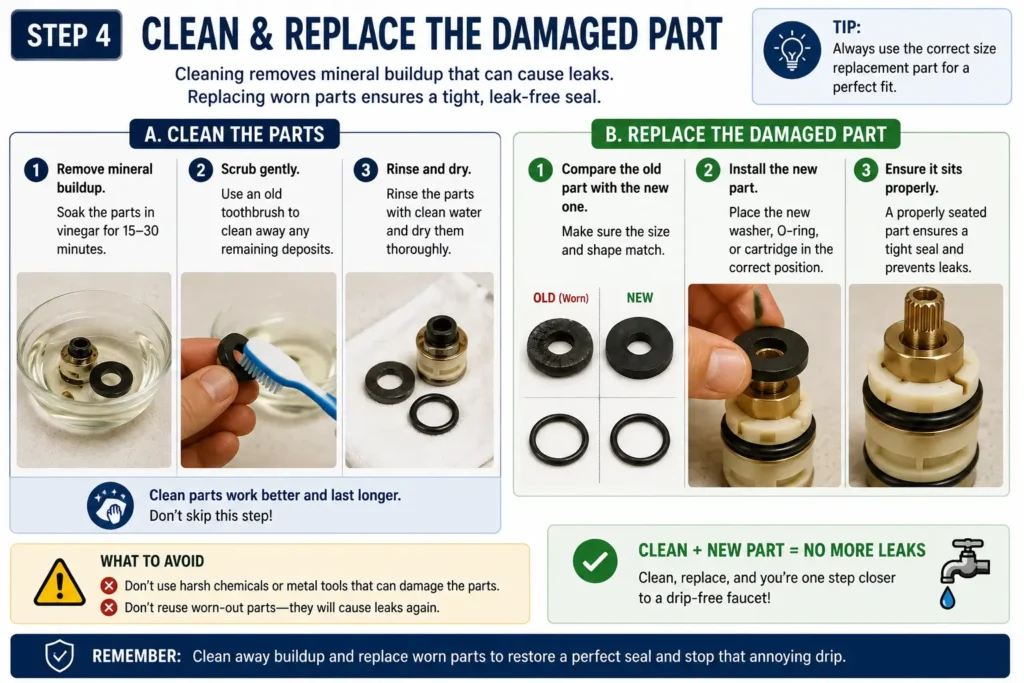
Tip: Clean accessible faucet components gently to avoid damaging seals and finished surfaces.
Mineral deposits and dirt can sometimes prevent faucet components from sealing correctly.
Clean accessible parts carefully with a soft cloth. Avoid damaging seals or scratching finished surfaces.
Use a soft cloth to remove loose dirt and mineral buildup from accessible parts. For stubborn deposits, follow the manufacturer’s cleaning recommendations and avoid scratching finished surfaces or damaging rubber seals.
Step 6: Replace the Damaged Part
Install the new washer, O-ring, or cartridge in the same position as the old one.
Make sure the replacement part is the correct size and type. Using an incorrect part may cause the faucet to continue leaking.
Before reassembling the faucet, make sure the replacement washer, O-ring, or cartridge is seated correctly. If the component has an alignment mark or tab, match it with the original position.
Step 7: Reassemble the Faucet
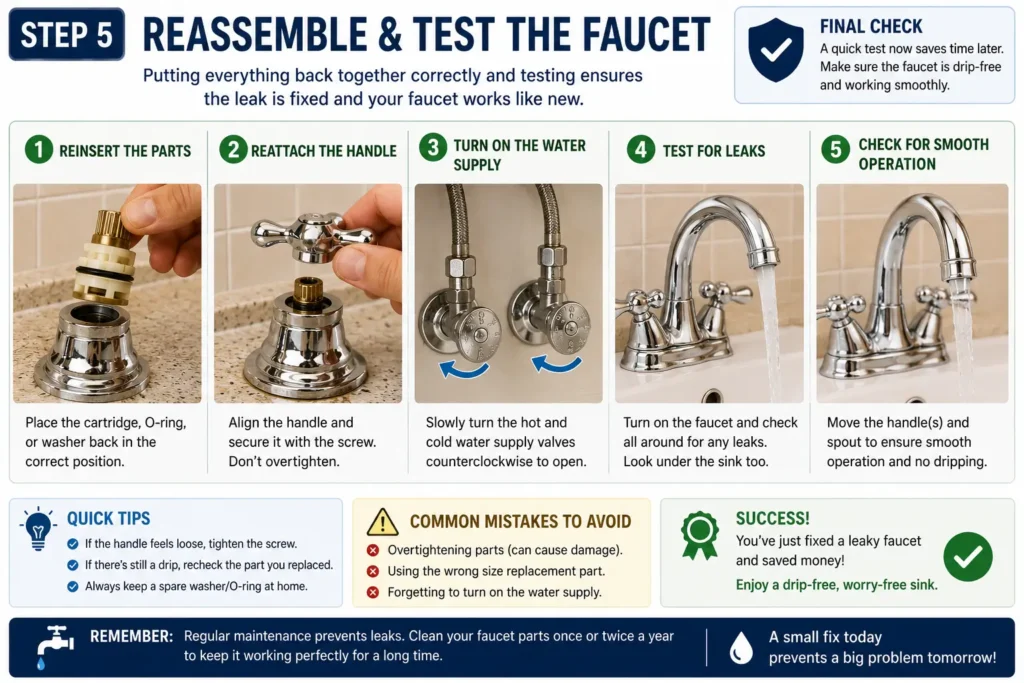
Put the faucet components back together in the reverse order.
Tighten everything securely, but don’t overtighten screws or fittings.
Step 8: Turn the Water Back On
Slowly reopen the water supply valves underneath the sink.
Slowly open the shut-off valves and check the faucet while the water pressure returns. Turn the faucet on and off several times and watch the spout, handle, faucet base, and connections underneath the sink. If everything stays dry, the repair is likely complete.. Then turn it off and check whether the dripping has stopped.
Also check underneath the sink for any unexpected leaks.
Common Mistakes to Avoid
Even a simple faucet repair can go wrong if you rush the process. Avoid these common mistakes:
Ignoring corrosion or damaged plumbing connections: If the leak is coming from a damaged connection or severely corroded component, consider getting professional help.
Not shutting off the water first: Always close the hot and cold water supply valves before taking the faucet apart.
Overtightening screws or fittings: Tighten components securely, but avoid using excessive force that could damage the faucet.
Installing the wrong replacement part: Make sure the washer, O-ring, or cartridge matches your faucet model and design.
Losing small screws down the drain: Keep the drain covered while removing small faucet components.
Reassembling components incorrectly: Take a quick photo before disassembly so you can check the original position of each part.
If you’re dealing with another common plumbing problem, see our guide Toilet Won’t Stop Running? 8 Easy Fixes to Try.
When Should You Call a Plumber?
A simple washer or cartridge replacement can often be handled at home. However, professional help may be appropriate if the faucet is severely corroded, the leak comes from the plumbing below the sink, a valve is damaged, or the problem continues after replacing the obvious worn parts.
Frequently Asked Questions
Can I fix a leaking faucet myself?
Many common faucet leaks caused by washers, O-rings, or cartridges can be fixed with basic tools. More complicated plumbing problems may require a professional.
Why does my faucet still drip after replacing the washer?
The problem could involve another component, such as the O-ring, cartridge, valve seat, or another worn internal part.
Should I replace the faucet instead of repairing it?
If the faucet is old, badly corroded, repeatedly leaking, or replacement parts are difficult to find, replacing it may be more practical.
Why is my faucet dripping from the spout?
A dripping spout can be caused by a worn washer, cartridge, valve component, or mineral buildup, depending on the faucet design.
Why is water leaking around my faucet handle?
A damaged O-ring, cartridge, or loose component can sometimes cause water to appear around the handle.
How do I know what replacement part I need?
Check the faucet brand and model if available. If the model is unknown, take the old component with you when purchasing a replacement so you can compare its size and design.
Why is my faucet still leaking after repair?
The wrong replacement part, incorrect installation, damaged valve components, corrosion, or another leak source may be responsible.
Final Thoughts
Knowing how to fix a leaky faucet can make this a simple home repair when the problem is caused by a worn or loose component. Start by shutting off the water, identify the damaged part carefully, and use the correct replacement.
If the leak continues or you’re unsure about the repair, getting help from a qualified plumber is the safer option.